Create Your Own Space Sensory Bin: A Step-by-Step Guide
Greetings, fellow crafters and parents! Today, I’m excited to share a delightful project that has become a staple in my household—the Space Sensory Bin. This engaging and interactive tool is fantastic for igniting your child’s imagination and enhancing their sensory development. As someone who thrives on crafting and creative play, I can't emphasize enough the joy and educational benefits this project brings.
What is a Space Sensory Bin?
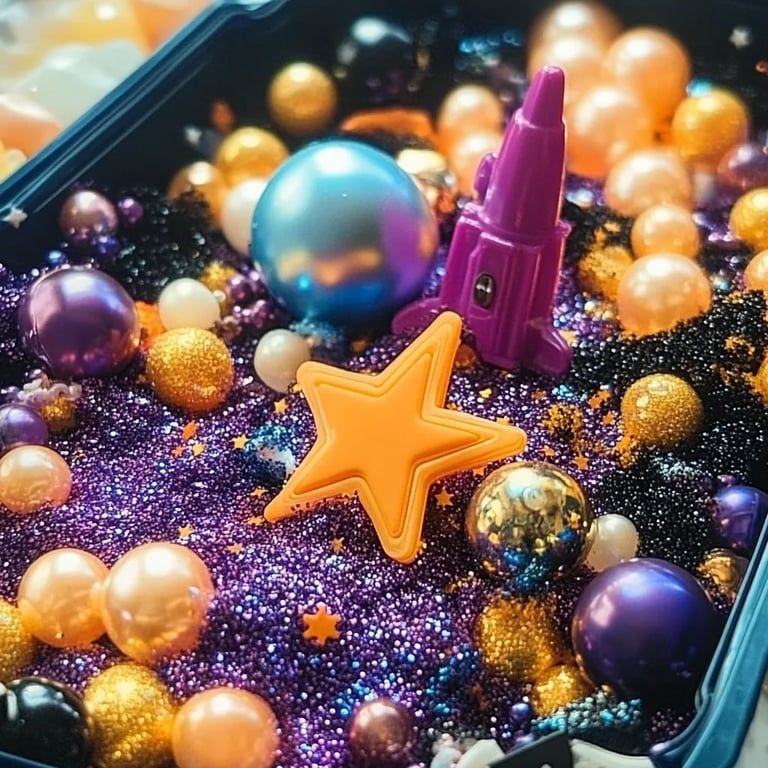
A Space Sensory Bin is a container filled with various materials that stimulate a child’s senses while providing a platform for imaginative play themed around outer space. It often includes elements such as stars, planets, and cosmic colors, all working together to create an immersive experience.
Why is it so popular, you ask? Well, sensory bins cater to various learning styles, offering hands-on exploration that is both fun and educational. Whether you’re using it for homeschooling, at a daycare, or just for some sensory play at home, this activity invites children to explore textures, colors, and concepts in a multi-sensory way. It’s particularly great for toddlers and preschoolers but can be adjusted for older children too.
When and How Can You Use It?
The beauty of a Space Sensory Bin lies in its versatility. You can set it up on a rainy day, during a space-themed unit study, or even as a calming activity before bedtime. The best part is that it takes only a little preparation, making it an excellent option for a quick afternoon project or a weekend crafting session.
So, let’s get started!
Materials You'll Need
Before we dive into the step-by-step process, here's a list of materials you’ll need:
- Base Material:
- Sand (play sand or kinetic sand)
- Rice dyed with food coloring (black, blue, or purple)
- Dried black beans or black pom-poms
- Space Elements:
- Plastic stars, planets, and rocket ships
- Glow-in-the-dark star stickers
- Foam stickers or cutouts of space-related objects
- Tools:
- A large plastic bin or container
- Mixing bowls or spoons for dyeing (if using rice)
- Optional:
- Tongs or scoops for fine motor skills
- Small containers for sorting or pretending
Now, gather your materials and let’s get to work!
Step-by-Step Tutorial for Making Your Space Sensory Bin
Step 1: Prepare Your Base Material
Why It Matters: The base material is the foundation of your sensory bin. Choosing the right texture can make a significant difference in the sensory experience.
How to Do It:
- If you prefer colored rice, fill a bowl with dry rice and add a few drops of food coloring. Mix thoroughly until every grain is colored. This process can be a fun hands-on experience for your kids—let them take ownership by helping out!
Potential Problems: If the rice is too wet, it won’t dry properly and could become clumpy. Make sure it’s well-mixed and spread it on a baking tray to dry for a few hours before using it.
Step 2: Choose Your Main Base
Why It Matters: The base (sand, rice, or beans) provides not only the sensory experience but also a backdrop for the space-themed items.
How to Do It:
- Pour your chosen base material into the plastic bin. If I’m using colored rice, I love to alternate layers for a beautifully textured effect that resembles space.
Tip: Use around 3-4 cups of base to ensure that there’s enough material for digging and playing.
Step 3: Add Space-Themed Items
Why It Matters: This step is where your sensory bin truly comes to life! The items you include spark curiosity and invite imaginative play.
How to Do It:
- Scatter your plastic stars, planets, and other space-themed items throughout the bin.
- Press the glow-in-the-dark stickers onto the inside walls of the bin to create a celestial atmosphere.
Personal Insight: I love using items that have different textures and sizes. It makes for a more diverse sensory experience. Consider adding mini astronauts or space animals for some creative storylines!
Step 4: Include Tools for Exploration
Why It Matters: Tools such as scoops, tongs, and containers can enhance fine motor skills and encourage further engagement with the materials.
How to Do It:
- Introduce various scoops and small containers alongside your sensory bin. This encourages kids to explore different textures, weights, and measurements.
Safety Warning: Supervise younger children and ensure that none of the small pieces pose a choking hazard.
Step 5: Engage and Play!
Why It Matters: The final step is where the magic happens! Allow your child to explore freely or guide them in structured play.
Creative Variations:
- Set up a space-themed scavenger hunt by hiding specific items in the bin for them to find.
- Create simple science experiments, such as mixing in small cups of water (to represent comets or space exploration) and observing how it affects the contents.
Troubleshooting Common Issues
As with any crafting endeavor, things don’t always go as planned. Here are a few common problems and their solutions:
- Dye Skin Stains: If using dyed rice, wear gloves while handling. If stains occur, soap and warm water usually do the trick.
- Boring Bin: If kids lose interest quickly, introduce a timer for space-themed activities, like building the tallest “rocket” using scoops of rice—challenge them!
Final Thoughts
Creating a Space Sensory Bin has brought so much joy and laughter into my home. Watching my kids engage in imaginative play while exploring the wonders of outer space fills me with happiness. Plus, it helps develop important sensory skills that they’ll carry into their future learning.
If you’re looking for an excellent rainy day activity or something to spark your child's imagination, I can't recommend this enough! The tactile experience combined with the endless opportunities for imaginative play makes it an invaluable addition to any play environment.
Now, gather those materials, unleash your creativity, and launch into the universe of sensory exploration! Don’t forget to share your experiences or variations in the comments—I’d love to hear about your adventures with your Space Sensory Bin! 🌌