Crafting Ocean Resin Bookmarks: A Step-by-Step Guide to Your DIY Adventure
There's something utterly delightful about holding a beautiful bookmark made of resin, particularly one that captures the serene yet captivating essence of the ocean. As someone who has dabbled in various crafts over the years, creating ocean-themed resin bookmarks has quickly become one of my favorite projects. Not only are these bookmarks practical for keeping your place in a beloved book, but they also serve as stunning pieces of art that reflect your personality and love for the ocean.
Why Ocean Resin Bookmarks?
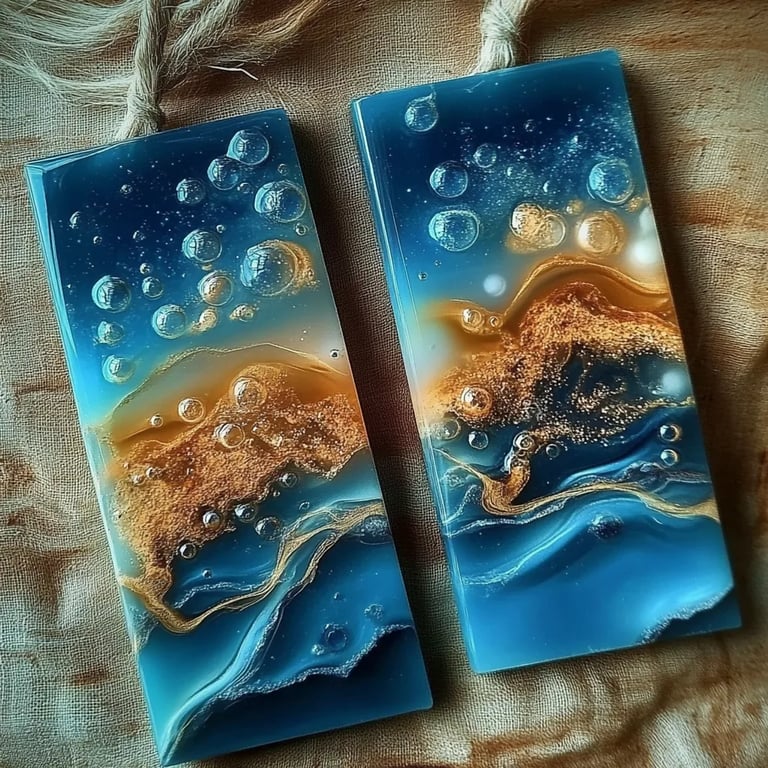
Ocean resin bookmarks are popular for several reasons. First, they are visually stunning, with layers of blues, turquoise, and even hints of sandy yellows—a miniature ocean crafted just for you. They make excellent gifts, are perfect for book lovers, and can be custom-made with personal touches, such as shells, glitter, or dried flowers. Plus, they are a fantastic way to practice your resin crafting skills!
You can use these bookmarks for any book, making them perfect for cozy evenings of reading or for wrapping as thoughtful gifts. Whether it’s for your favorite novel, a study guide, or a journal, these bookmarks will bring a little joy to your literary adventures.
Tools and Materials You Will Need
Before diving into the process, let's gather everything necessary for this project. The beauty of DIY is that almost everything can be found at local craft stores or online.
Materials:
- Epoxy Resin: Choose a high-quality, clear epoxy resin made for crafts (around 1:1 ratio).
- Resin Pigments: Blue, turquoise, and green pigments to mimic the ocean waves.
- Glitter: Optional, for a bit of sparkle (look for fine, eco-friendly options).
- Small Decorative Elements: Seashells, starfish, dried flowers, or even small gemstones.
- Silicone Mold for Bookmarks: Look for molds that shape like traditional bookmarks.
- Acetone or Alcohol Wipes: For cleaning your tools.
- Disposable Cups and Sticks: For mixing the resin.
- Heat Gun or Torch: To remove bubbles in the resin.
- Craft Gloves and Protective Eyewear: Safety first!
Step-by-Step Tutorial on Making Ocean Resin Bookmarks
Step 1: Prepare Your Workspace
Setting up a clean, well-ventilated workspace is crucial. Since resin can be a bit messy, lay down a protective covering like plastic or cardboard. Make sure you have all your materials within reach. I usually find that having everything organized in small containers helps minimize the clutter.
Step 2: Measure and Mix the Resin
Following the instructions on your epoxy resin, measure equal parts of the resin and hardener into a disposable cup. Use a stir stick to mix them thoroughly for about 3-4 minutes. Mixing is crucial; if not done properly, the resin may not cure correctly.
Tip: If you notice that the resin begins to heat up (which happens with some brands), you may have mixed too vigorously. Ideally, the mixture should remain cool to the touch.
Step 3: Add Color
Once the resin is completely mixed, it’s time to add your pigments. Start with a drop of blue pigment and mix well. Next, you can experiment with different colors. I often use turquoise and a hint of white to mimic waves crashing.
Creative Variation: For a sunset effect, consider layering colored resin. Pour a blue layer, let it cure slightly (about 10-15 minutes), then pour a thin layer of orange or pink resin on top for a unique gradient.
Step 4: Pouring into the Mold
Carefully pour the colored resin into your silicone mold. Try not to pour it too quickly to prevent bubbles from forming. If you want to embed decorative elements (like seashells or glitter), pour a small amount of resin first, place your decorations, and then cover with more resin to encapsulate them.
Safety Warning: Always wear gloves during this process, as resin can be irritating to the skin.
Step 5: Removing Bubbles
After pouring, use a heat gun or torch to gently heat the surface of the resin. Hold the heat source about 6 inches away from the surface and move it in a circular motion. You'll see bubbles rise and pop—this is crucial for achieving that smooth, glassy finish.
What Could Go Wrong: If you notice large bubbles trapped in the resin after it has cured, you can always sand them down later, but that can be time-consuming.
Step 6: Curing
Allow the resin to cure according to the manufacturer’s guidelines, usually 24-48 hours. Ensure it’s left undisturbed in a dust-free environment.
Tip: Avoid using a fan to speed up the curing process. This can create dust particles that might ruin the finish of your bookmark.
Step 7: Demolding and Finishing
Once cured, gently flex the silicone mold to release the bookmarks. Inspect them for any imperfections. If you see rough edges, you can sand them down with fine grit sandpaper for a smooth finish.
Step 8: Add a Personal Touch
I love finishing off my bookmarks by adding a ribbon or twine at the top, making it easier to grasp when pulling from a book. You can even personalize them by engraving or painting initials or inspirational quotes on the back.
Troubleshooting Common Issues
- Foggy Resin: If your resin cures with a foggy appearance, it might be moisture interfering with the curing process. Next time, ensure your workspace is dry.
- Sticky Surface: If your bookmarks are still tacky after curing, you may not have mixed the resin properly. You can fix this by applying a thin layer of resin over the top after thorough cleaning.
- Uneven Colors: If your colors blended unintentionally, try adding more layers in different colors to create a marbled effect.
Conclusion: Your Ocean Awaits!
Crafting ocean resin bookmarks is not just a DIY project; it's a journey full of creativity and imagination. I hope this tutorial inspires you to dive in and create your own unique bookmarks. Remember, crafting requires patience and practice; don't get discouraged if things don't turn out perfectly the first time. Every mistake is an opportunity to learn and refine your skills.
Feel free to experiment with colors, shapes, and decorations. And who knows? You might end up creating a collection of bookmarks that could even be a new passion or a side hustle. Happy crafting, and may the beauty of the ocean adorn your reading adventures!