Crafting Joyful Memories: How to Make a Colorful Leaf Turkey Craft
As the crisp autumn air begins to weave its magic, it’s the perfect time for crafting projects that capture the beauty of the season. One delightful craft that I've fallen in love with over the years is the Colorful Leaf Turkey. This charming little creation not only brings the festive spirit to your home but also serves as a fun centerpiece for Thanksgiving or a whimsical addition to any autumn decoration scheme. As someone who has spent countless hours with glue and scissors, I’m excited to guide you through this colorful journey of creativity.
Why the Leaf Turkey?
The Colorful Leaf Turkey is a wonderful representation of the season, combining the vibrant colors of fall leaves with the iconic imagery of Thanksgiving. It’s a popular craft among families, teachers, and crafters alike, as it provides a tactile and visual experience, supporting fine motor skills and encouraging creativity in children. Plus, who doesn’t love an excuse to get outside and collect beautiful leaves?
When Can I Use This Craft?
This turkey can be displayed as part of your Thanksgiving decorations, turned into a fun classroom project, or even used as a greeting card for loved ones. Its versatility makes it perfect for a variety of occasions, from family craft nights to school functions.
The Materials You'll Need
Before we dive into the crafting process, let’s gather some accessible and fun materials. Here's what you’ll need:
- Colorful leaves (maple, oak, or any variety you can find)
- Brown construction paper (for the turkey body)
- Googly eyes (or you can draw them with a marker if you prefer)
- Glue (liquid school glue or a glue stick)
- Scissors
- Markers or crayons (for details)
- Optional: Glitter or washi tape (for added flair)
Step-by-Step Tutorial
Step 1: Collect Your Materials
I love beginning the process by heading outdoors. Take a little walk in your local park or around your neighborhood to collect a variety of leaves, in different shapes and sizes. When collecting leaves, it’s best to pick those that are vibrant and not too brittle so they hold up during the crafting process.
Tip: Avoid leaves that are too dry or crumbling, as they may break apart during assembly.
Step 2: Prepare Your Leaf Selection
Once you've gathered your leaves, spread them out on a flat surface and give them a little clean. You can gently wipe them with a damp cloth to remove any dirt, and lay them flat to dry.
Warning: Be cautious when handling unfamiliar plants. Always make sure the leaves are non-toxic and safe, especially if children are involved.
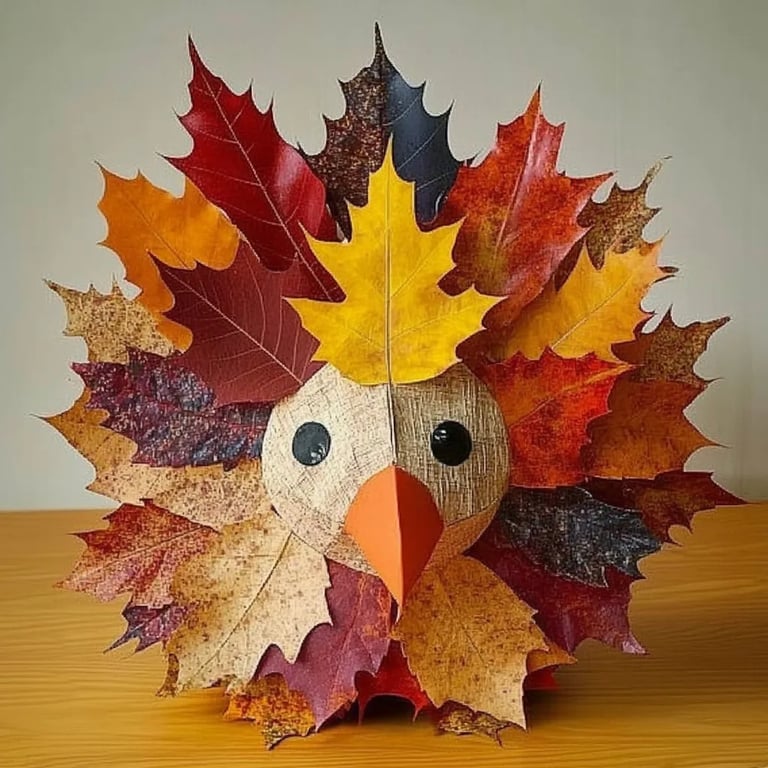
Step 3: Create the Turkey Body
Take your brown construction paper and cut out an oval shape for the turkey's body. This will be the foundation of your turkey, so make it relatively big to hold the leaves. Remember, since the turkey will be sitting upright, you can cut a flat base for stability.
Tip: Embrace the imperfections in your cutting! This is about creativity. Plus, every zigzag will add character!
Step 4: Attach the Leaves
Now the fun part begins! Start by choosing what will be the turkey's feathers. Begin gluing the leaves onto the back of the oval body shape. Layer them so they fan out, alternating colors and sizes for a more dynamic look.
What to watch out for: Be careful not to glue the leaves too close together; you want to allow some space for a nice visual spread.
Step 5: Add the Details
Once your leaves are glued down, it’s time to bring your turkey to life! Grab those googly eyes and apply them to the front of the turkey body. Using your markers or crayons, draw a beak and some feet. This is where you can really let your personality shine!
Alternative method: If you want a more natural look, you could skip the googly eyes and instead draw them on or use small seeds to create a similar effect.
Step 6: Final Touches
To give your turkey some extra pizazz, you might want to sprinkle a little glitter on top or trace around the leaves with washi tape. Just be careful when applying any additional decorations; you want to enhance your turkey, not overwhelm it.
Step 7: Display Your Creation
Now that your turkey is complete, find the perfect spot to display it! Whether it’s on your dining room table or a school display board, your Colorful Leaf Turkey will surely be a conversation starter.
Troubleshooting Common Issues
- Leaves Falling Off: If you notice that leaves are detaching, just add a bit of glue and hold it in place until it sets.
- Wading While Cutting: If your cuts are going awry, try tracing your shape with a pencil first or use pinking shears for a fun edge.
Creative Variations
Feeling adventurous? Here are some variations you might consider for your Colorful Leaf Turkey:
- Leaf Collage: Instead of a traditional turkey, use a canvas to create a larger collage of leaves to form a turkey shape.
- Different Mediums: Experiment with fabric leaves, paint, or even magazine cutouts if you're looking to mix things up.
Personal Anecdote
I remember the first time I made the Leaf Turkey with my kids. It wasn't just about the craft; it was about the laughter we shared, the stories we exchanged about each leaf we found, and the warmth of creating something beautiful together. Crafts are never just about the end product; they’re about the process and the memories we make along the way.
Final Thoughts
The Colorful Leaf Turkey craft is a simple yet powerful way to celebrate the season’s beauty while engaging your creativity. It’s a wonderful activity for both kids and adults, encouraging us to take a moment to appreciate nature and what it can offer. Armed with this guide, I hope you feel inspired to give it a try! Gather those leaves, gather your family, and most importantly, gather your joy into a colorful masterpiece. Happy crafting!