Crafting Delights: How to Make Gelatine Flower Suncatchers
Hello, fellow crafters! Today, I'm excited to share a whimsical and beautiful project that not only adds a pop of color to your home but also brings the charm of spring into your space, year-round—Gelatine Flower Suncatchers. These delightful creations are perfect for brightening up windows and can be crafted with ease using simple materials you likely have around your house. Whether you're a seasoned crafter or a beginner looking for a fun project, I guarantee you’ll enjoy the journey of creating these luminous floral designs.
What Are Gelatine Flower Suncatchers?
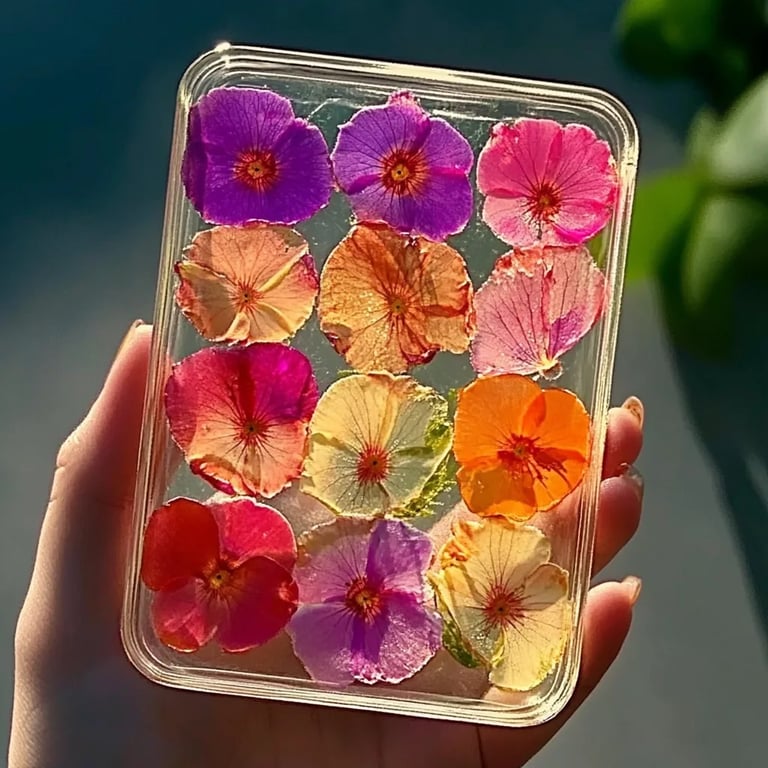
Gelatine Flower Suncatchers are artistic decorations made from gelatin, vibrant food dyes, and various natural flower petals. When sunlight hits these translucent pieces, they produce a stunning display of color that dances across surfaces—like a kaleidoscope of nature. These suncatchers are not just eye-catching; they’re versatile too! You can use them in your home, hang them in your garden, or even create them as gifts. They’re especially lovely for spring and summer, but who says we can’t have our summer flowers inside during the winter months as well?
Why Are They So Popular?
People love Gelatine Flower Suncatchers for several reasons:
- Simplicity: The materials and steps are straightforward, making it accessible to all skill levels.
- Customization: You can choose your color palette and flower types to match your decor.
- Nature's Beauty: They incorporate real flower petals, offering a sustainable and organic touch to crafting.
Now, let’s dive into the how-to of making these stunning suncatchers!
Materials You Will Need:
- Unflavored Gelatin: Look for powdered gelatin (around 1-2 packets depending on your desired thickness).
- Water: You’ll need some boiling water and cold water to set the gelatin.
- Food Coloring or Natural Colorants: Choose any colors that inspire you—think about reds, pinks, blues, and yellows.
- Fresh or Dried Flower Petals: Use edible flowers like violets, pansies, or even herbs like basil for a unique twist.
- Molds: Silicone molds or shallow dishes work best (make sure they are not too deep).
- Butterfly Squeezer or Straw: To create holes for hanging (optional).
- Cooking Spray or Oil: To lightly coat the molds, preventing sticking.
- A Spoon and a Bowl: For mixing.
Step-by-Step Tutorial
Step 1: Prepare Your Work Area
Before we get started, I always make sure my workspace is tidy and equipped with all the materials I need. Lay down some parchment paper or newspaper to catch any drips, and have your molds ready to go. This will help you move seamlessly through the crafting process.
Step 2: Bloom the Gelatin
In your bowl, sprinkle the unflavored gelatin over 1 cup of cold water. Let it sit for about 5-10 minutes. This step is crucial as it allows the gelatin to 'bloom', ensuring a smooth, gel-like consistency. If you skip this step, you might end up with clumps in your mixture.
Step 3: Dissolve the Gelatin
After blooming, it’s time to dissolve the gelatin! In a pot, bring about 2 cups of water to a boil. Remove it from heat, and slowly add in your bloomed gelatin mixture while stirring until it fully dissolves. If you notice any remaining clumps, return it to low heat, but do not let it boil!
Personal Anecdote: When I first started crafting, I rushed this step and was met with a lumpy end-result! Patience is key, my friends.
Step 4: Add Color
This is where the fun begins! Once the gelatin is fully dissolved, it's time to add your food coloring. Go for a small amount at first and adjust based on your preference. Remember, you can always add more but can’t take it out!
Tip: For a more natural look, try using beet juice or spinach puree instead!
Step 5: Arrange the Flowers
Lightly spray your molds with cooking spray to prevent sticking. Now, carefully place your chosen flower petals into the molds, arranging them any way you like. I usually alternate colors and sizes for a vibrant visual.
Safety Warning: Remember to use only edible flowers or those that have been cleaned properly if they have been picked from outside. Always do your research to ensure you’re using safe varieties!
Step 6: Pour the Gelatin Mixture
Gently pour your colorful gelatin mixture over the flowers in the molds, making sure they are submerged. A simple spoon can help guide the liquid, ensuring even coverage.
What could go wrong here? If the petals float to the top, give it a light stir with a skewer to ensure they're distributed evenly.
Step 7: Setting Time
Now, let these beauties set! Place them in the refrigerator for at least 4-6 hours, or ideally, overnight for the best results. You want them to be firm to touch, so during this time, resist the urge to peek (I know, it’s hard!).
Step 8: Unmolding
When you’re ready, gently twist the molds or use a spatula to carefully pry them out. If they’re stuck, a brief soak in warm water can help free them.
Step 9: Adding Holes for Hanging
If you want to hang your suncatchers, consider using a straw or a decorative squeezer to create holes near the top before fully setting them. Alternatively, you can drill holes afterward with a Dremel tool, but proceed with care.
Step 10: Display Your Masterpiece
Now for the grand finale! Use fishing line or string to hang your suncatchers in the sunlight or outside. Watch as they catch the light and illuminate your space!
Creative Variations
- Layering Colors: Experiment with pouring different colored layers of gelatin to create a striped effect.
- Themed Suncatchers: Try making them themed for holidays (orange and black for Halloween, or red and green for Christmas).
- Using Leaves: Try combining both petals and leaves for a more complex design.
Common Questions and Troubleshooting:
- Why did my gelatin not set?
- Ensure you're using enough gelatin. If the ratio between water and gelatin is off, it won’t thicken properly.
- How do I fix bubbles in my mixture?
- If you notice bubbles, you can gently tap the sides of the mold to release them before they set, or gently blow on them to pop!
- Can I store them?
- Yes! You can keep your suncatchers in the fridge for a few days, but be mindful; the longer they’re out, the more they can fade or deteriorate.
Final Thoughts
Crafting Gelatine Flower Suncatchers is not just a fun activity; it’s a creative way to celebrate the beauty of flowers and the joys of sunshine. I hope this detailed guide makes you feel empowered to create your own stunning suncatchers and unleash your creativity. Remember, the true beauty lies not only in the finished piece but also in the crafting journey along the way.
So gather your supplies, invite some friends over, or spend a cozy afternoon crafting solo—whatever you choose, enjoy the process of bringing a splash of color and nature into your home! Happy crafting!