Crafting Delightful Pumpkin Faces from Paper Cups or Plates
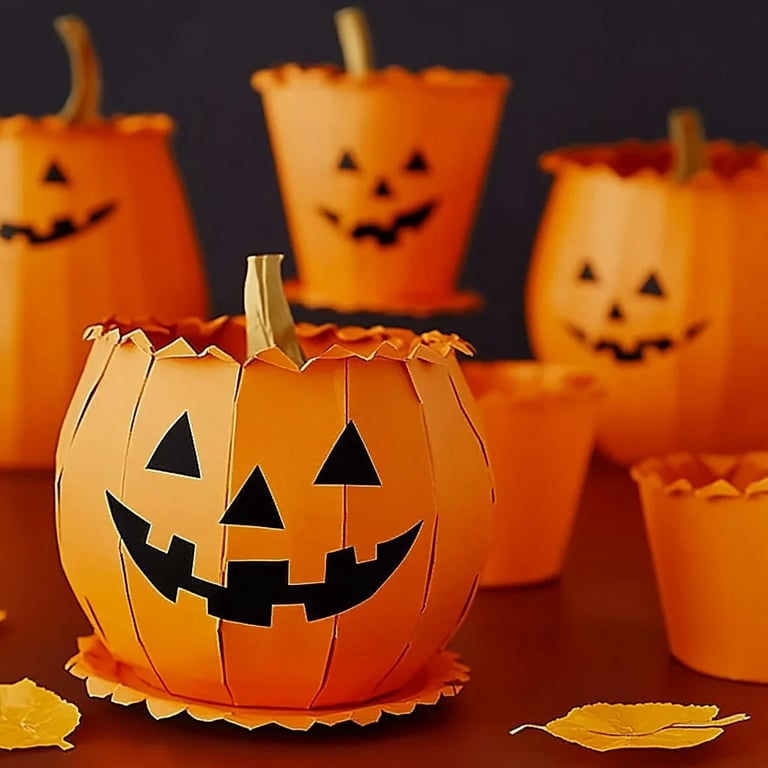
Autumn is such a magical season, isn't it? The leaves transform into vibrant hues, the air gets a little crisper, and we are greeted with a plethora of pumpkin-themed crafts that come out of hibernation. One of my absolute favorite fall crafts is creating pumpkin faces using simple paper cups or plates. Not only is this project budget-friendly, but it's also an excellent way to get creative, and it's perfect for both kids and adults alike. Whether you're preparing for Halloween, planning a fall-themed party, or just looking for a fun weekend project, making these whimsical pumpkin faces is a festive way to bring the spirit of the season into your home.
Why Are Pumpkin Faces So Popular?
Pumpkin faces, in their many forms, evoke a sense of nostalgia and joy. They symbolize Halloween and harvest festivities and can be customized to express various moods and themes. The beauty of crafting pumpkin faces from paper materials lies in their versatility: you can either go for a traditional jack-o-lantern look or unleash your creativity with quirky designs. They are also light and safe, making them excellent for decoration or even party favors.
When and How to Use Your Pumpkin Faces
You can display your delightful pumpkin creations during Halloween, Thanksgiving, or any autumn gathering. They make charming centerpieces for tables, fun additions to a classroom, or playful decorations in your living space. Plus, they’re an ideal project to do with children, sparking creativity and providing an opportunity to bond through crafting.
—
Materials You Will Need
Before we dive into the process, gather your supplies. Here’s what you will need:
- Paper Cups or Plates: Choose orange cups or plates to mimic the pumpkin color, but white or other colors work too if you want to paint them.
- Black Construction Paper or Felt: This will be used for the facial features.
- Scissors: Essential for cutting out your features.
- Glue or Glue Stick: For adhering shapes to your cups or plates.
- Markers or Paint (Optional): Depending on your desired look, you might want to add extra details.
- Green Pipe Cleaners or Leaf Cutouts (Optional): For a whimsical or realistic pumpkin stalk.
- Craft Knife or Sharp Scissors (For adults’ use only): If you want to create holes in the cups for added depth.
Step-by-Step Guide to Making Pumpkin Faces
Step 1: Prepare Your Work Area
Before beginning your craft, set up a designated workspace. Lay down a protective covering to prevent any stains or messes. Having a clean and organized area will inspire creativity, and it also allows you to work without distractions.
Step 2: Choose Your Base
Select your preferred base for your pumpkin face. If you're using cups, you might want to flip them upside down. For plates, orient them as you would serve food. This distinction can create different visual effects.
Step 3: Cut Out Facial Features
Using the black construction paper or felt, start cutting out various facial features—eyes, noses, and mouths. Here’s a quick guide:
- Eyes: Experiment with shapes (triangles for a more traditional look, circles for cuter expressions).
- Noses: Simple triangles, circles, or even quirky shapes can bring your pumpkin face to life.
- Mouths: Be creative! Smirks, frowns, or even silly designs can add personality.
Tip: If you're crafting with little ones, pre-cutting the features can prevent accidents with scissors.
Step 4: Arrange and Glue
Once all your features are cut out, it's time to play with arrangements. Lay them out on the cup or plate to see how they look together. Don't rush this process—take it as an opportunity to brainstorm different expressions.
When you’re happy with the layout, begin gluing the features onto your chosen base. Apply enough glue to ensure they stay in place, but avoid overdoing it, as it may lead to a mess.
Step 5: Add Extra Details
Here’s where you can take this craft to the next level. Use markers or paint to add fun details—like cheek spots, texture stripes, or even glitter! If you've opted for pipe cleaners, twist them to form an enchanting stalk that adds an authentic flair.
Step 6: Allow to Dry
Ensure your pumpkin faces have enough time to dry completely. It’s tempting to rush this step, but adequate drying time will prevent features from peeling off later.
Step 7: Display Your Pumpkin Faces
Once everything is dry, it's time to show off your artistic work! Arrange them on your mantle, use them as table settings for your fall feast, or scatter them around a children's space for a playful touch.
—
Troubleshooting and Creative Variations
While crafting is usually smooth sailing, there are times when things can go awry. Here are a few common issues and solutions:
- Issue: Glue seeps out and creates a mess.
- Solution: Use less glue and apply it directly to the cutouts rather than the base.
- Issue: Features don't stick well.
- Solution: Make sure to press down firmly on the features and wait for the glue to dry. Alternatively, use double-sided tape for a stronger hold.
Alternative Methods
- Painted Faces: Instead of cutting out features, grab your paint and have fun painting directly onto your cups or plates. This method allows for more detail and fine-tuning.
- 3D Pumpkin Faces: Use puffed-up materials, like tissue paper or cotton balls, to give your pumpkin faces texture. This adds dimension and makes them even more engaging.
—
Safety Warnings
Always supervise children when using scissors or crafting knives, and remind them to be careful of sharp edges. Additionally, make sure to use non-toxic materials since little hands may handle the finished products.
—
Personal Reflections and Final Thoughts
Creating pumpkin faces from paper cups or plates has become one of my cherished autumn traditions. I remember a particular year when my family and I transformed our entire dining table into a pumpkin patch. The laughter, creativity, and beauty that came from those simple crafts are moments I hold dear.
The possibilities are endless with this project—don’t shy away from exploring new expressions and designs. Each craft is unique, reflecting your personality and creativity. So grab your supplies, unleash your imagination, and enjoy the delightful process of crafting your very own set of pumpkin faces! I promise, these charming decorations will not only brighten your space but also spark joy and nostalgia for years to come. Happy crafting!