Crafting Air Dry Clay Pencil Toppers: A Step-by-Step Guide
Hello, fellow crafters! If you’re like me, you have a special connection with your pens and pencils. They’re not just tools; they’re a canvas for our creativity, a companion in our learning journeys, and often, a little piece of our personality. Today, I want to share my love for crafting by showing you how to make adorable air-dry clay pencil toppers. These little accents not only brighten up your writing tools but also make fantastic gifts for friends, students, or anyone who appreciates a little whimsy in their stationery.
Why Pencil Toppers Are Popular
Pencil toppers have steadily gained popularity as customizable craft projects. Not only are they functional, but they also allow for endless creativity. You can make them in various shapes and themes—cute animals, favorite characters, or even abstract art! They’re a fun way to add a personal touch to your writing tools and can be excellent conversation starters.
When to Use Pencil Toppers
Whether you’re getting ready for the back-to-school season, planning a fun crafting session with kids, or simply want to jazz up your home office supplies, air-dry clay pencil toppers are perfect for any occasion. Plus, they are an excellent way to entice young ones into writing or drawing by making the experience a lot more colorful and fun!
Materials Needed
Before we dive into the fun part of crafting, let’s gather our materials. Here’s what you’ll need:
- Air Dry Clay: Pick a brand that’s easy to work with. White clay is versatile as you can paint over it later.
- Pencil or Pen: Ensure it has a removable top, as we’ll be placing our clay atop it.
- A Crafting Surface: Use a clean table or a silicone mat to protect your workspace.
- Tools: A rolling pin, cookie cutters or sculpting tools, and a small knife or scraper.
- Paints (optional): For decoration after the clay dries; acrylic paints work well.
- Clear Acrylic Sealer (optional): For a glossy finish if you decide to paint your topper.
Step-by-Step Tutorial
Step 1: Prepare the Clay
Start by taking a lump of air-dry clay about the size of a golf ball. Knead it in your hands for a few minutes until it becomes soft and pliable. This step is crucial because it ensures that the clay will mold easily and create a smooth surface.
Tip: Be sure your hands are clean and dry to prevent any dirt or moisture from getting into the clay.
Step 2: Shape the Clay
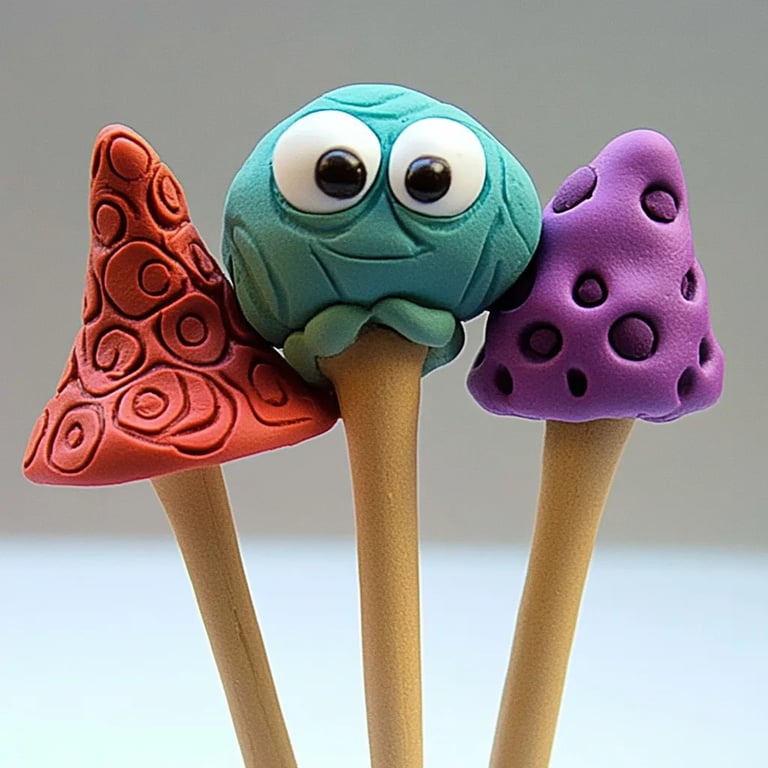
Using a rolling pin, roll out your clay on your crafting surface until it’s about 1/4 inch thick. If you’re making a simple shape like a cloud or star, use cookie cutters to cut the desired shape. If you want to get more creative and sculpt a character, now’s the time! For example, you could shape the clay into a cute cat or a whimsical flower.
Why This Matters: The thickness of your clay piece can affect its drying time and durability. Thicker pieces may crack during drying, while thinner pieces could be too fragile.
Step 3: Create the Hole
Before the clay fully dries, you need to make a hole for the pencil or pen. Gently press the tip of the pencil into the clay's center and twist it slightly to form a snug hole. Ensure the hole fits the top of your pencil snugly; it should hold the topper without falling off during use.
What Could Go Wrong: If your hole is too big, the topper might fall off. If it’s too small, it won’t fit. You can use a small knife or a clay tool to carefully widen it or reshape it if necessary.
Step 4: Add Details
Now for the fun part! Add facial features, textures, or any decorations you wish. For instance, if you chose to sculpt an animal, you can create eyes with small beads or other clay pieces. Using a toothpick or sculpting tool, you can carve details or texture into your clay for more realistic features.
Personal Anecdote: I once made a little elephant pencil topper, detailed with tiny ears and a pink heart-shaped tail. Watching my niece’s excitement when she received it was priceless!
Step 5: Drying Time
Place your finished topper on a clean, flat surface and let it air dry for at least 24 hours. The drying time can vary based on the thickness of your piece, so the general rule is to wait until it feels completely solid.
Advisory: Keep the topper away from direct sunlight or heat sources while drying to prevent warping.
Step 6: Painting and Finishing Touches
Once the clay is dried, grab your acrylic paints and get to work customizing your topper further. This step is optional but adds character and personal touch to each piece. Use a paintbrush to carefully apply your designs, and let it dry completely. If you like a glossy finish, apply a clear acrylic sealer once the paint is dry.
Alternative Methods: If you want to skip the painting, consider using markers or washi tape for a quick decoration.
Step 7: Assemble and Enjoy
Finally, once everything is dry, simply slide the topper onto the top of your pencil or pen. Voilà! You have your very own air dry clay pencil topper ready to bring a smile to your face—or someone else’s.
Troubleshooting Common Issues
- Cracking: If your clay cracks while drying, it was likely too thick or dried too fast. To fix this in the future, ensure even thickness and avoid direct heat sources.
- Warped Shapes: This often happens if the topper is not placed flat while drying. Always dry your pieces on a level surface.
- Difficulty Painting: If your paint isn’t adhering to the clay, try lightly sanding the surface after it dries for better adhesion.
Creative Variations
The beauty of crafting pencil toppers is that the possibilities are endless! You could create seasonal themes like pumpkins for Halloween, snowflakes for winter, or flowers for spring. Consider making matching sets; a pencil topper for your favorite writing tool and a matching charm for your backpack.
Final Thoughts
Creating air-dry clay pencil toppers is not only therapeutic but also an exciting way to express creativity. Don’t worry about perfection, embrace the uneven lines, and quirky details—those become the charm of homemade crafts. Remember, each piece is a reflection of you. I hope this guide inspires you to embark on your crafting adventure! Happy crafting!
If you liked this tutorial, please share your own pencil toppers on social media, and tag your creations so I can see the magic you make. Let’s inspire and uplift our crafting community together!