Crafting a Colorful Foam Bubble Pile: A Step-by-Step Guide to Joyful Creativity
Hello, fellow crafters! I'm so excited to share with you one of my absolute favorite projects: creating a Colorful Foam Bubble Pile. This delightful concoction is not only visually appealing but also incredibly fun to make and play with—perfect for sensory play activities, party decorations, or simply indulging your inner child. Whether you host a birthday bash, want to make slime, or just embark on a creative adventure with your kids, this project will bring color and joy to your space.
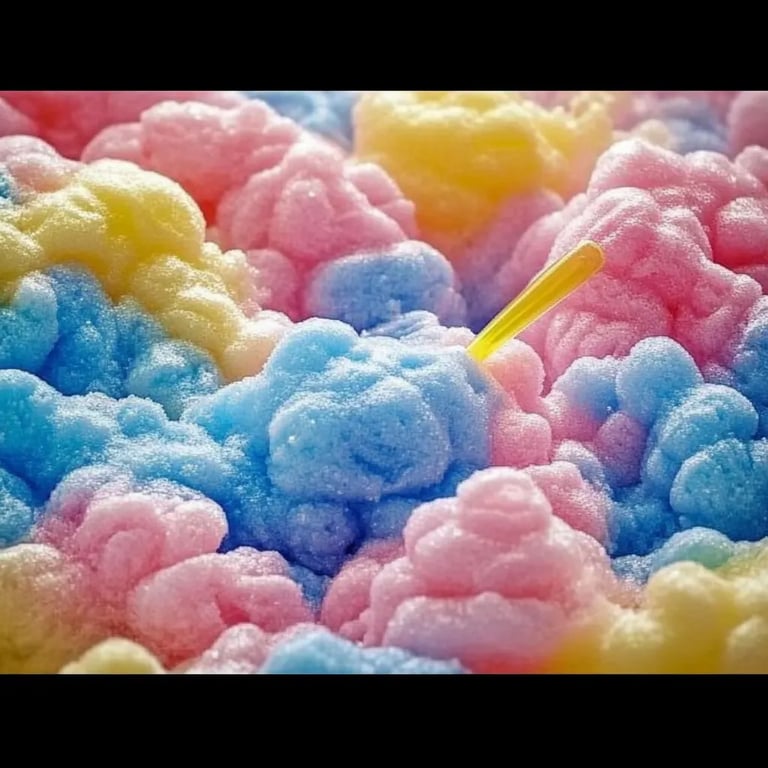
What is a Colorful Foam Bubble Pile?
A Colorful Foam Bubble Pile is exactly what it sounds like: a fluffy, airy pile of foam bubbles that can be created using readily available materials. This mixture boasts a delightful texture that captivates the senses and is perfect for tactile exploration. It has become popular not only for its playful vibe but also for its educational value, allowing kids to engage in hands-on learning about texture, color mixing, and even basic chemistry.
When to Use a Foam Bubble Pile
- Birthday Parties: Add some vibrant decor to the festivities with a colorful foam pile.
- Sensory Play: Great for kids who enjoy tactile experiences, sparking their curiosity and imagination.
- Art Projects: Use as a base for creative endeavors, combining with other materials for mixed-media art.
- Holiday Celebrations: Customize the colors to match any theme—think red and green for Christmas or pastels for Easter.
What You’ll Need
Before we dive into the steps, let me list the materials you’ll need to create your own Colorful Foam Bubble Pile. I promise, these are mostly household items!
Materials
- Shaving Cream: 1 can (preferably unscented for better color mixing)
- School Glue: 1 cup (white or clear works best)
- Food Coloring or Liquid Watercolor: Several colors (get creative here!)
- Mixing Bowl: For combining all those exciting ingredients
- Whisk or Spoon: To mix the ingredients (I recommend a whisk for fluffiness)
- Table or Surface Covering: Old newspapers or plastic tablecloth to keep your workspace clean
- Container for Storage: Airtight container or plastic bag (if you want to save extras)
Safety Tips
- Always conduct the project in a well-ventilated area, especially if using scented products.
- Supervise children closely, particularly if they are younger or prone to putting things in their mouths.
Step-by-Step Tutorial
Let’s get right into the crafting process! Follow along, and I'll guide you through each part while sharing tips and insights to ensure your Foam Bubble Pile turns out just perfect.
Step 1: Prepare Your Workspace
Clear a large, flat surface. Lay down the newspaper or tablecloth to catch spills. This not only saves you from a messy cleanup but allows you to focus on being creative instead of worrying about the mess.
Step 2: Combine Shaving Cream and Glue
In your mixing bowl, add 1 cup of school glue and then top it off with your shakable cloud of shaving cream! The combination of these two ingredients is what gives your foam its airy texture. It's essential to use equal parts glue and shaving cream—this ratio ensures that your bubble pile has structure and won't become too runny.
Tip: If you want a lighter foam, add more shaving cream. If it tends to be too fluffy, increase the glue.
Step 3: Mix Until Fluffy
Using the whisk, gently combine the glue and shaving cream. You want to fold the mixture together with a loving touch—it’s not a race! If you whisk too aggressively, you're more likely to flatten out your foam and lose that desired fluffiness. I often find that doing this with a soft touch results in a light and airy texture that’s just perfect.
What to Watch For: If you notice that the combination is too sticky or doesn't hold its shape, you might have added too much shaving cream. Simply add a bit more glue and mix again.
Step 4: Add Food Coloring
Here comes the fun part! Now that your foam is mixed, it’s time to add color. If you’re using food coloring, start with 3-4 drops of your chosen color and mix it in. I love to create a rainbow pile, so I often make several small batches, each time adding different colors.
Note: Liquid watercolor can also be used for more vibrant colors. Just be careful not to go overboard; a little goes a long way!
Step 5: Mix Different Colors
If you’re feeling adventurous, take two batches of different colors and gently mix them together. This blend will create a marbling effect—an exciting visual addition to your foam pile!
Step 6: Storage and Use
Once you’ve created your masterpiece, the foam can be used right away or stored in an airtight container. Remember, it typically lasts for about a week if properly stored. I love to bring mine out again for playtime, and if it starts to dry out a bit, I just add a sprinkle of water to rejuvenate it.
Creative Variations
- Transform It: Instead of using food coloring for just a plain color, experiment with glitter for a sparkling effect or scented oils for a great aromatic experience.
- Add Textures: Mix in small beads or other textured materials to enhance the sensory experience.
- Theme It: Coordinate your colors to match holidays or specific themes—red, white, and blue for the Fourth of July, for instance!
Common Pitfalls and How to Overcome Them
- Too Runny: If your foam pile is more like a soupy mess than fluffy foam, it may be due to excess shaving cream. Just carefully add more glue until you achieve the desired consistency.
- Too Sticky: Sometimes, the foam can get overly tacky. If this happens, adding a bit of cornstarch can help to absorb the excess moisture.
- Color Bleeding: This can happen if you mix colors that are too similar. To avoid this, always use contrasting colors and mix gently.
My Personal Anecdote
I’ll never forget the first time I made a Colorful Foam Bubble Pile with my youngest daughter. We ended up with a rainbow of colors, and as we mixed, it became a full-blown art session, with foam splattered on our clothes, walls, and even the ceiling! The joy and laughter that filled our home that day were worth every bit of cleanup.
Conclusion
Creating a Colorful Foam Bubble Pile is not only an engaging craft but also a wonderful opportunity for exploration and creativity. It's a way to bond with family and friends while tapping into the sheer joy of art-making. I encourage you to gather your materials, invite your little ones (or friends!), and let loose your imagination. Remember, crafting is about the process, not just the end result—so enjoy every bubbly moment!
If you try this project, I'd love to hear about your experiences, variations, or any tips you've discovered along the way. Happy crafting!