Celery Science Experiment: A Beginner’s Guide to Exploring Plant Transformation
As an experienced crafter and science aficionado, I’m excited to share one of my favorite, hands-on science experiments: the Celery Science Experiment! This delightful project combines the simplicity of everyday materials with the captivating magic of plant biology. Using just a few household items, we can observe capillary action and vascular structure in plants—a concept that’s not only fascinating but also incredibly educational for kids and curious adults alike.
What is the Celery Science Experiment?
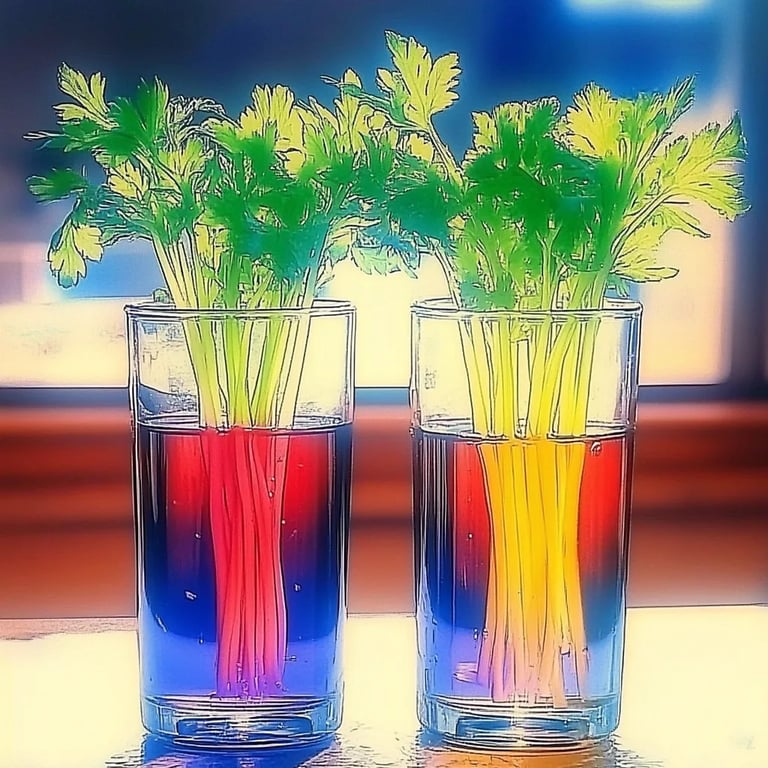
The Celery Science Experiment primarily involves taking a stalk of celery and placing it in colored water to see how the plant absorbs the colored liquid. Over time, you'll notice the leaves at the top of the celery changing colors, vividly demonstrating how water travels through plants. This experiment is popular among teachers and parents who want to spark curiosity in children about plant biology, and it can easily be done at home using accessible materials.
Whether you're looking for a fun weekend activity, a science project for school, or simply an intriguing way to pass the time, this experiment is perfect for all ages and skill levels. Let's dive into the process together!
Materials You'll Need
To set up your Celery Science Experiment, you’ll need:
- Fresh Celery Stalks: Look for stalks that have leaves at the top; they will show the results better.
- Food Coloring: Choose vibrant colors (red, blue, or green) to make the effect more dramatic and visually appealing.
- Clear Cups or Glasses: Use at least three cups so you can experiment with different colors.
- Water: Tap water works fine for this experiment.
- A Sharp Knife (optional, adult supervision needed): For trimming the celery if necessary.
- Paper Towels or Dishtowels: For clean-up, as this experiment can get a little messy.
Step-by-Step Tutorial
Now, let’s embark on this science journey together. Here’s how to set up your experiment, step by step:
Step 1: Prepare the Celery
Begin by trimming the end of the celery stalk under running water. This step is essential as it allows the celery to take in more water and facilitates better absorption of the colored water. A fresh cut exposes the xylem, the vascular tissue responsible for water transport.
Tip: Make sure to cut a small amount—just about an inch off the base. If you cut too much, the celery may not absorb water efficiently.
Step 2: Prepare Your Colored Water
Fill small cups or glasses about half full with water. Then, add several drops of food coloring to each cup. You can use different colors in each cup for comparison. Stir gently until the food coloring is fully dissolved in the water.
Why This Matters: The intensity of the color will directly impact how easily you can see the results later on. More drops equal a more vivid display.
Step 3: Insert the Celery
Now, place the trimmed celery stalks into the cups of colored water. Make sure the base of the celery is submerged completely to allow for maximum absorption.
Caution: If you’ve got younger helpers, supervise them when using the knife and ensure they’re careful with liquids to avoid spills.
Step 4: Observe and Wait
Let the celery sit in the colored water for at least 30 minutes. For best results, leave it for several hours or even overnight. During this waiting period, encourage your kids or friends to discuss what they think will happen.
What Could Go Wrong: If you don’t see any color change after several hours, double-check that the celery was freshly cut and that the base is submerged completely.
Step 5: Record Your Observations
After waiting, carefully remove the celery from the colored water, and observe the leaves and stalk closely. You should see an exciting transformation as the colors rise through the celery!
Personal Anecdote: I remember the first time I conducted this experiment with my niece. We were both amazed at how quickly the colors made their way up! It sparked her imagination and led to hours of discussions about plant biology.
Tips for Success
- Experiment with Different Variables: Try using different types of liquids (like vinegar, or sugar water) to see how absorption changes. This adds an extra layer of excitement and learning to your experiment.
- Time Trials: Keep track of how long it takes for the colors to travel different distances up the celery to work on timing as a scientific variable.
- Use a Measuring Cup: For more precision, measure the amount of water used and the amount of food coloring added. This helps introduce concepts of measurement and scientific method.
Creative Variations
- Rainbow Celery: Use several cups with various colors and watch how the celery absorbs different shades. This often results in a beautiful gradient effect in the celery.
- Celery in Two Colors: Split the base of the celery stalk and place each end in a cup with a different colored water. This provides a beautiful visual of how colors mix.
Safety Warnings
- Ensure adult supervision if sharp objects are involved, especially if children are participating.
- If you’re using older cups or containers, be cautious of glass breakage during the experiment.
Conclusion
As you can see, the Celery Science Experiment is more than just a fun activity; it’s a wonderful opportunity for learning and creativity. With minimal materials and a little patience, you can witness the amazing journey of water in plants. Don’t forget to encourage curious questions and further investigations afterward—perhaps a journal documenting this experiment could inspire future scientific explorations!
I hope this guide inspires you to try the Celery Science Experiment in your home! Your children (or yourself!) will delight in the natural processes of plants while fostering a love for science. Happy experimenting!